

Configuring your HP printer for optimal black and white print quality ensures crisp text, clear graphics, and efficient ink or toner usage. Whether you’re printing professional documents, school assignments, or invoices, adjusting the correct print settings can significantly improve output quality while reducing printing costs.
Understanding Black and White Print Quality Settings
HP printers offer multiple print quality options depending on your model. These settings control ink usage, resolution, and print speed.
Common black and white print settings include:
- Draft Mode – Fast printing with reduced ink usage.
- Normal Mode – Balanced quality and speed.
- Best/High Quality Mode – Sharpest text and darker blacks.
- Grayscale Printing – Prints using black ink only.
- Black Ink Only Mode – Prevents use of color cartridges.
Choosing the right setting depends on your printing needs. For professional documents, “Best” or “High Quality” mode is recommended.
Steps to Configure HP Printer Print Quality on Windows
4
Follow these steps to configure print quality on a Windows PC:
Step 1: Open Printer Settings
- Click Start Menu
- Go to Settings
- Select Bluetooth & Devices
- Click Printers & Scanners
- Choose your HP printer
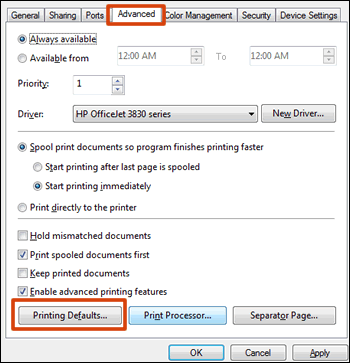
Step 2: Access Printing Preferences
- Click Printing Preferences
- Navigate to the Paper/Quality or Advanced tab
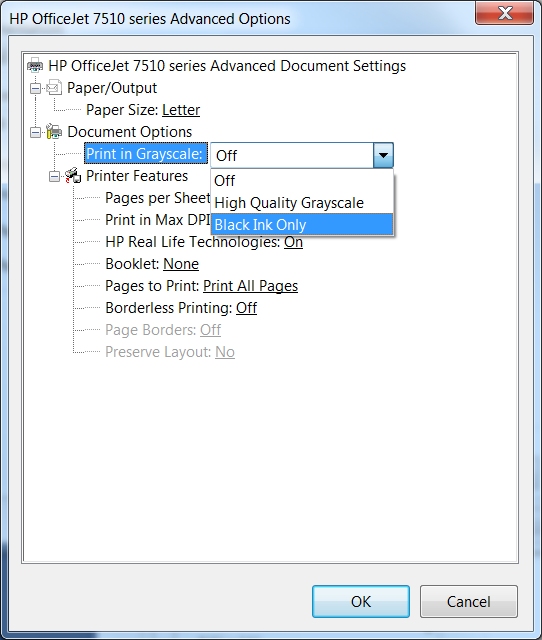
Step 3: Select Black and White Mode
- Choose Black & White
- Enable Print in Grayscale
- Select Black Ink Only (if available)
Step 4: Adjust Print Quality
- Select Draft, Normal, or Best
- For sharper text, choose Best or increase DPI settings
Step 5: Save Settings
Click Apply and then OK to save changes.
Steps to Configure HP Printer Print Quality on Mac


4
To adjust black and white print settings on macOS:
Step 1: Open Print Dialog
- Open the document
- Click File
- Select Print
Step 2: Choose Printer
Select your HP printer from the dropdown menu.
Step 3: Access Quality Settings
- Click Show Details
- Navigate to Quality & Media or Color Options
Step 4: Enable Grayscale
- Select Grayscale
- Choose Black Ink Only (if available)
Step 5: Adjust Quality Level
- Choose Standard for regular documents
- Choose Best for professional documents
Click Print to confirm.
Configure Black Ink Only Mode from HP Smart App
4
If you’re using the HP Smart app:
- Open HP Smart.
- Select your printer.
- Click Print Documents.
- Open Printer Settings.
- Choose Black & White or Grayscale.
- Adjust quality to Best or Normal.
- Print your document.
HP Smart makes it easy to manage quality settings without accessing system controls.
Best Print Quality Settings for Different Needs
| Printing Need | Recommended Setting |
|---|---|
| Draft notes | Draft + Grayscale |
| Office documents | Normal + Black Ink Only |
| Contracts & reports | Best + Black Ink Only |
| Sharp text output | High DPI + Best Mode |
Improve Black and White Print Quality
If your documents appear faded, streaked, or unclear, try these steps:
Clean the Printhead
- Open HP printer maintenance settings
- Select Clean Printhead
- Run cleaning cycle
Align the Printer
- Choose Align Printer
- Print alignment page
- Follow on-screen instructions
Check Ink or Toner Levels
Low black ink or toner can reduce print clarity.
Use Quality Paper
Standard office paper works for daily use, but premium paper enhances text sharpness.
Troubleshooting HP Printer Black and White Printing Issues
If black and white printing is not working correctly, consider these solutions:
Printer Printing Faded Black Text
- Replace low black cartridge
- Increase print density in Advanced Settings
Printer Using Color Ink Instead of Black
- Enable Black Ink Only
- Disable color correction
- Update printer drivers
Printer Not Printing in Grayscale
- Reinstall HP printer driver
- Reset printing preferences
- Restart printer and computer
Update HP Printer Drivers for Better Print Quality
Outdated drivers can affect print clarity and grayscale performance.
Steps to Update:
- Open Device Manager (Windows)
- Locate your printer
- Select Update Driver
- Choose automatic update
Keeping drivers updated ensures compatibility and optimized performance.
Benefits of Proper Black and White Configuration
- Reduced ink usage
- Lower printing costs
- Sharper text output
- Professional document appearance
- Improved printer lifespan
Proper configuration prevents unnecessary color ink usage and ensures consistent quality.
Conclusion
Configuring HP printer print quality for black and white documents is simple yet essential for achieving sharp, professional results. By adjusting grayscale settings, selecting the appropriate print quality mode, and maintaining your printer regularly, you can ensure consistent performance and cost-efficient printing.
Leave a Reply