

HP printers are known for delivering sharp text and vibrant images. However, after replacing ink cartridges, some users may notice blurred images, smudged prints, faded colors, or streaked output. This issue is common and usually related to printhead alignment, cartridge installation, or printer settings.
Why Is My HP Printer Printing Blurry After Ink Replacement?
When you install new ink cartridges, the printer may require calibration or cleaning. Blurred prints typically occur due to:
- Improper cartridge installation
- Protective tape not removed from new cartridge
- Printhead misalignment
- Clogged printhead nozzles
- Low-quality or incompatible ink cartridges
- Incorrect paper settings
- Outdated printer drivers
Understanding the cause helps you apply the correct fix.
Check Ink Cartridge Installation


4
One of the most common reasons for blurred images is improper cartridge placement.
Steps to verify cartridge installation:
- Turn on the printer.
- Open the cartridge access door.
- Remove the ink cartridge carefully.
- Ensure the protective plastic tape is fully removed.
- Reinsert the cartridge until it clicks into place.
- Close the access door and allow the printer to initialize.
If the cartridge is loose or not aligned correctly, prints may appear blurry.
Run Printhead Cleaning Utility
After installing new ink, dried ink residue or air bubbles can affect print quality.
To clean the printhead:
- Open HP Printer Software on your computer.
- Go to Printer Maintenance or Tools.
- Select Clean Printhead.
- Follow on-screen instructions.
- Print a test page.
You may need to run the cleaning cycle 1–2 times for better results. Avoid excessive cleaning as it consumes ink.
Align the Printhead
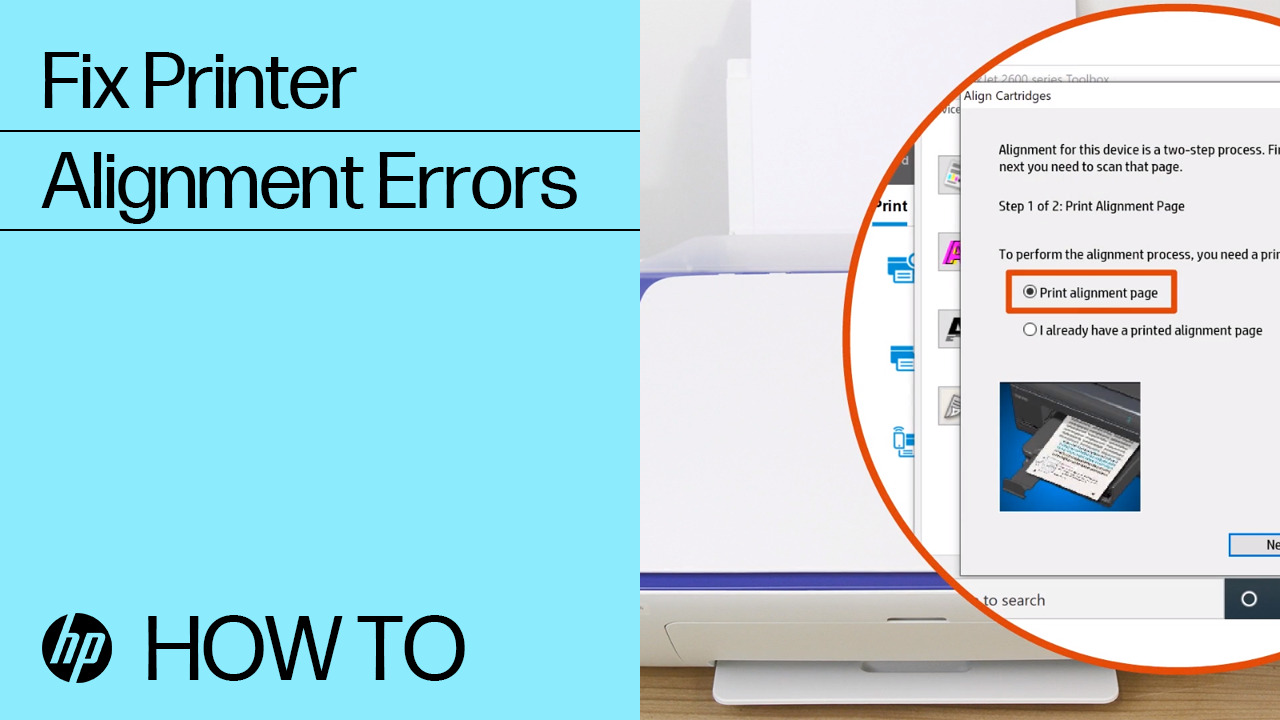
Misalignment can cause blurry or double images.
To align the printer:
- Load plain white paper into the tray.
- Open printer settings on your computer.
- Navigate to Tools or Printer Maintenance.
- Select Align Printhead.
- Print and scan the alignment page (if prompted).
Alignment ensures ink droplets are placed precisely on paper.
Check Paper and Print Settings
Incorrect settings can impact image clarity.
- Make sure paper type matches the selected setting (e.g., photo paper, plain paper).
- Select Best or High Quality print mode.
- Ensure the correct paper size is selected.
- Avoid damp or low-quality paper.
High-resolution images require high-quality print settings.
Update HP Printer Drivers
Outdated drivers can cause printing issues including blurry output.
To update drivers:
- Open Device Manager (Windows).
- Locate your HP printer.
- Right-click and select Update Driver.
- Choose automatic update option.
Alternatively, install the latest software from official HP support resources.
Updated drivers improve performance and fix compatibility issues.
Perform Printer Firmware Update
Firmware updates fix bugs and enhance print quality.
- Open HP printer software.
- Go to Printer Updates or Web Services.
- Check for available firmware updates.
- Install updates and restart the printer.
Keeping firmware updated prevents print quality problems.
Check Ink Levels and Cartridge Compatibility
Low or incompatible cartridges may produce blurred prints.
- Verify ink levels through printer software.
- Use genuine HP cartridges for best performance.
- Ensure cartridges are designed for your printer model.
Refilled or third-party cartridges sometimes cause smudging or misalignment.
Clean Encoder Strip (Advanced Step)
If blurred printing continues, the encoder strip inside the printer may be dirty.
- Turn off and unplug the printer.
- Carefully clean the transparent strip using a lint-free cloth.
- Avoid applying pressure.
This step is recommended only if you’re comfortable handling internal components.
Restart Printer and Reset Settings
Sometimes a simple reset resolves the issue.
To reset:
- Turn off the printer.
- Unplug from power source.
- Wait 60 seconds.
- Plug back in and turn on.
You may also restore default print settings from printer menu.
HP Printer Not Working After Ink Replacement – Troubleshooting Tips
If your HP printer is still printing blurred images:
- Reinstall printer software.
- Remove and reinstall ink cartridges.
- Try printing from a different device.
- Run built-in diagnostic tools.
- Check for hardware damage.
Persistent issues may indicate a faulty cartridge or printhead.
HP Printer Customer Support and Service Options
If troubleshooting doesn’t resolve the problem:
- Contact HP customer support for assistance.
- Schedule printer servicing if under warranty.
- Check warranty status before repair.
- Request cartridge replacement if defective.
Professional service ensures long-term printer reliability.
How to Activate and Register Your HP Printer
Registering your printer helps with warranty and support access.
- Install HP printer software.
- Create or log in to your HP account.
- Register the device using serial number.
- Activate warranty and update services.
This helps receive firmware updates and technical assistance.
Prevent Blurry Printing in the Future
To avoid blurred images after future ink replacements:
- Always use genuine HP cartridges.
- Run alignment after every cartridge change.
- Print regularly to prevent clogging.
- Store cartridges properly.
- Keep printer firmware updated.
- Perform routine maintenance.
Regular care keeps your HP printer performing at its best.
Conclusion
If your HP printer is printing blurred images after ink replacement, the issue is usually related to cartridge installation, alignment, or printhead cleaning. By following the troubleshooting steps above — including cleaning, aligning, updating drivers, and checking print settings — you can restore sharp, high-quality prints quickly.
Leave a Reply